Drafting the Astrolabe 11: The Unequal Hour Arcs
- on 02.26.12
- Astrolabe Project, Drafting The Astrolabe
- No Comments
The next step, and the last scale to be added to the back of my astrolabe, is the unequal hour scale.
In the middle ages, there where several timekeeping systems in use, as opposed to the single one we use now. This next scale was designed to convert between two of these systems: The Equal Hour and Unequal Hour systems.
The Equal Hour system is the one you are familiar with; 24 hours of 60 minutes each. The Unequal Hour system is different: The day (sunrise to sunset) and the night (sunset to sunrise) are each divided into 12 hours, regardless of the time of year. Therefore in Summer an hour of daylight is longer than an hour of darkness, and in Winter the reverse is true. The sun rises at the start of the first hour of the day and sets at the end of the 12th hour of the day, which is also the start of the first hour of the night; and local noon marks the end of the 6th hour.
Further discussion and examples can be found in my class handout.
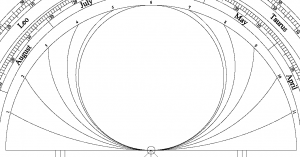
The completed scale looks like this:
Depending on the astrolabe the scale may be on either or both sides, as it is symmetrical.
Drawing the unequal hour arcs is relatively straightforward once you understand the trick. The following is adapted from Stoeffler and Morrison (see recommended reading ).
First, draw an arc just inside the innermost ring; centered on the center of the astrolabe, and forming a half-circle above the shadow squares.
Next divide the arc into twelve equal parts. Stoeffler suggests that you use the outer elevation scale and make a mark every 15 degrees.
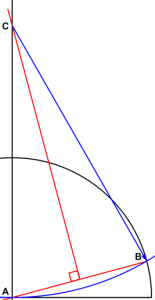
Now look at the figure above. Note that because the scale is symmetrical, the center of each arc will lie somewhere on the vertical center-line. Note also that each arc touches two points: The astrolabe central pivot, and one of the marks just made, therefore these two points must be an equal distance from the arc center.
This means that you can find the center of each arc by raising a perpendicular bisector to the line between the two points and marking where it crosses the center line (see Drafting the Astrolabe: 2. Methods of geometric construction).
Step1: Draw a light construction line from Point A (the astrolabe center) to Point B (any one of the twelve fifteen-degree hour lines).
Step 2: Erect a perpendicular bisector from line AB to the astrolabe mid-line and mark it Point C.
Step 3: Place the point of your compass at Point C and draw an arc from Point A to Point B (mirrored on both sides if that is your wish).
Step 4: Repeat until all the arcs are drawn. Erase construction lines and label the arcs as shown above.
