Drafting the Astrolabe 12: Planning the climates

Before I tackle the next bit I need to plan out what I want to do. I want a set of five climate plates, one for each of five different latitudes. One of these will need to be for the latitude of Cooper’s Lake, the site of the annual Pennsic War. Another should be the latitude of my home, of course. For the other three I will select from latitudes of Major cities I have visited.
This gives me the following list:
  • 39 degrees – My home latitude
  • 41 degrees – Pennsic War
  • 49 degrees – Paris
  • 52 degrees – London/Cambridge
  • 56 degrees – Copenhagen
As for drawing the plates themselves, it occurs to me that a lot of the work is going to be either identical or very similar for each plate. This suggests to me that doing all five plates at once, that is, completing each step on all five plates before moving on, will be the most efficient way forward.
The process for creating a climate plate breaks down as follows:
  1. Draw the outer edge of the plate. Add the Meridian and east-west line. Draw the Tropics and Equator.
  2. Draw the almucantars (circles of elevation) to include the horizon and the twilight line.
  3. Draw the azimuth arcs
  4. Draw the equal hour arcs
As I did with the front and back of the astrolabe I will detail each step as I go along.
Watch this space!
Drafting the Astrolabe 11: The Unequal Hour Arcs – Completed

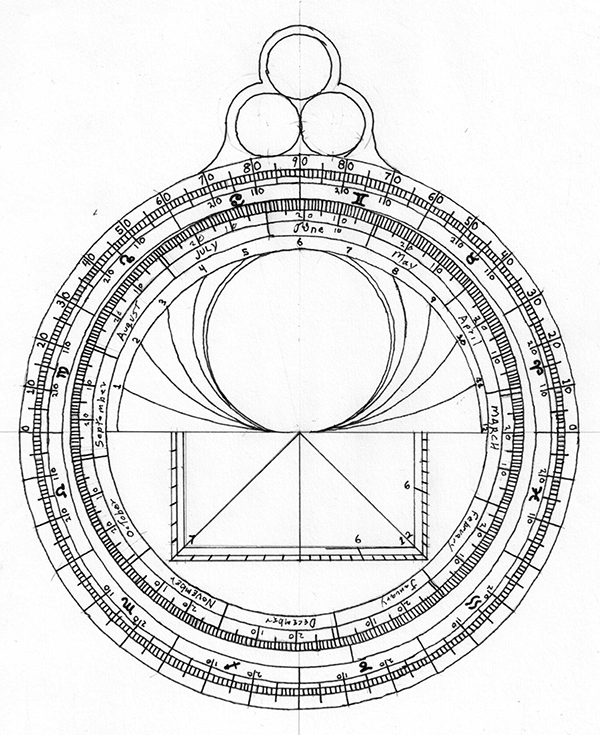
The unequal hours arcs have now been added to the back of the astrolabe. With the exception of what little decoration I’m planning, this completes work on the back of the project.

Unequal hours completed

Unequal hours completed

With the front and the back now finished, the next step is designing a set of climate plates. Doing five of those will get a bit tedious, perhaps, so I’ll probably take a break part-way through to do the rete and then the alidade and rule.

There’s an App for That: An astrolabe for the iPad

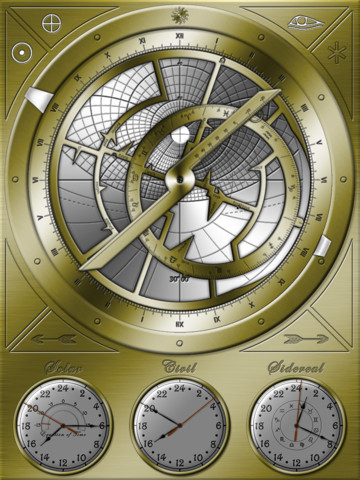
As I mentioned a while back, there is a developer out there using the output of the Astrolabe Generator to create an astrolabe app for the iPad. Well, version 1 is complete and available for free on the App Store. The website is: http://taucetisystems.com/. I have not had a chance to look at it yet, as I don’t have an iPad, but it looks very nice: Just the kind of thing I was hoping the Generator would inspire.

Phaeton for iPad

Phaeton for iPad

Bug Swatting and New Options

One of the Astrolabe Generator’s users, Jürgen Hoefeld, spotted a problem with the alignment of the Houses of Heaven, the intersection point should be on the horizon, and was not. I have it fixed now and the changes checked in to SourceForge. I have posted the updated generator to the site as well. In addition to the fix I have included two new options for the back, both still works in progress:

There is now an option to show the Lunar Mansions inside the Shadow Squares; and in the upper right quadrant drop-down there are options to display the Arcs of the Signs.

Astrolabes on YouTube

Two videos I ran across on YouTube:

The first is a good, quick introduction to the tool LINK.

The second is a very nice breakdown of a practical use of the astrolabe LINK.

Drafting the Astrolabe 11: The Unequal Hour Arcs

The next step, and the last scale to be added to the back of my astrolabe, is the unequal hour scale.

In the middle ages, there where several timekeeping systems in use, as opposed to the single one we use now. This next scale was designed to convert between two of these systems: The Equal Hour and Unequal Hour systems.

The Equal Hour system is the one you are familiar with; 24 hours of 60 minutes each. The Unequal Hour system is different: The day (sunrise to sunset) and the night (sunset to sunrise) are each    divided into 12 hours, regardless of the time of year. Therefore in Summer an hour of daylight is longer than an hour of    darkness, and in Winter the reverse is true. The sun rises at the start of the first hour of the day and sets at the end of the 12th hour of the day, which is also the start of the first hour of the night; and local noon marks the end of the 6th hour.

Further discussion and examples can be found in my class handout.

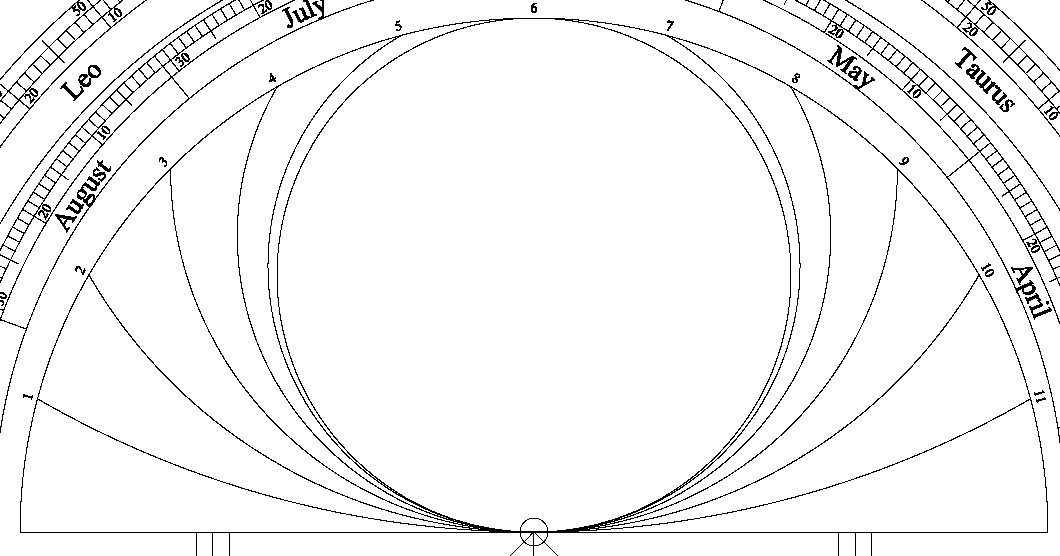
The completed scale looks like this:

Unequal Hours Example

Depending on the astrolabe the scale may be on either or both sides, as it is symmetrical.

Drawing the unequal hour arcs is relatively straightforward once you understand the trick. The following is adapted from Stoeffler and Morrison (see recommended reading ).

First, draw an arc just inside the innermost ring; centered on the center of the astrolabe, and forming a half-circle above the shadow squares.Drawing the unequal hour lines

Next divide the arc into twelve equal parts. Stoeffler suggests that you use the outer elevation scale and make a mark every 15 degrees.

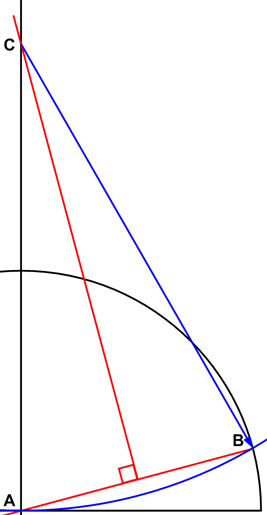
Now look at the figure above. Note that because the scale is symmetrical, the center of each arc will lie somewhere on the vertical center-line. Note also that each arc touches two points: The astrolabe central pivot, and one of the marks just made, therefore these two points must be an equal distance from the arc center.

This means that you can find the center of each arc by raising a perpendicular bisector to the line between the two points and marking where it crosses the center line (see Drafting the Astrolabe: 2. Methods of geometric construction).

Step1: Draw a light construction line from Point A (the astrolabe center) to Point B (any one of the twelve fifteen-degree hour lines).

Step 2: Erect a perpendicular bisector from line AB to the astrolabe mid-line and mark it Point C.

Step 3: Place the point of your compass at Point C and draw an arc from Point A to Point B (mirrored on both sides if that is your wish).

Step 4: Repeat until all the arcs are drawn. Erase construction lines and label the arcs as shown above.


Random Jottings

The Missing Manual has gone missing!

As some of you might have noticed, the Joomla site for Astrolabe: The Missing Manual is gone. Like the original wiki it replaced, it was not meeting my needs, so I nuked it.  Do not despair! The manual still exists, and is still being added to regularly (more regularly than this blog lately). I replaced an overly complicated site with a simple PDF. The link is on the right as “Astrolabe Manual”… I will update this file as I add to the manual, and will provide version information inside the front cover.

Plans and instructions for making a plastic astrolabe

I stumbled across this today at Thingverse: A plastic working astrolabe. The creator made it back in June 2010, and didn’t stumble across my site until afterword. Here’s hoping that someone will be inspired to make more…

There’s an app for that

Or there will be soon. I was contacted by a developer who is working on an iPad app that simulates various medieval astronomical devices. He will be using files made with the Astrolabe Generator. I’ll post information here when it becomes available.

Drafting the Astrolabe 10: The Shadow Squares – Completed

I thought I posted this two weeks ago… Work and life have gotten busier than I realized it seems.

Anyway, here is the completed shadow square section. Next up will be the unequal hours scale and then the back will be done.

Astrolabe: Completed shadow squares

Pennsic: Scientific Instrument Day on Artisan’s Row

For those of us that like to put the science into Arts and Sciences, Artisan’s Row at Pennsic this year will have a day devoted to scientific instruments and tools.
I have been asked by the Artisan’s Row Dean to organize a day devoted to the tools and instruments of the sciences. I am looking for like-minded artists and artisans who are involved in making and using such tools to spend a few hours displaying their work and sharing their knowledge. I’m being very broad in my definition of both science and tool here: For example, someone willing to demonstrate medieval methods of casting astrological natal charts would be welcome.
So, If your interest is in the scientific tools and instrumentation of the period, be it navigation, timekeeping, surveying, alchemical glassware, weights and measures, astronomical, etc. Please get in touch with me.
Please repost to any discussion lists you think might be interested.
Master Richard Wymarc
wymarc(at)hotmail.com

Drafting the Astrolabe 10: The Shadow Squares

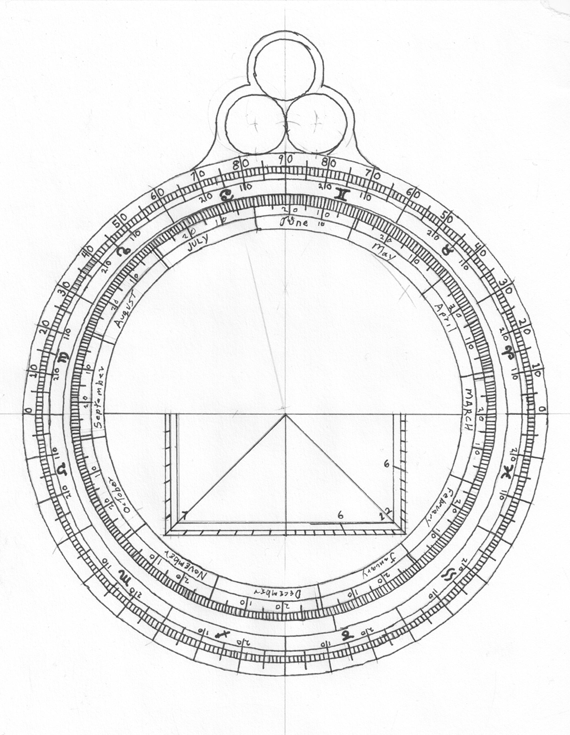
Drawing the Shadow SquareGetting the zodiac and calendar rings done was probably the worse, most finicky part of this project; the rest of the tasks remaining might require careful measurement, and attention to detail, but orders of magnitude less work than the last section.
The next task is to finish off the rear of the astrolabe. Two scales remain to be drawn, the Unequal hours and the shadow squares.

Drafting the shadow squares is straight-forward: Two square boxes in the bottom half of the astrolabe back, each side divided into a set number of sections. The only trick bit will be finding the correct size for the boxes. I want the shadow squares to be as big as possible, as larger means more accurate to draw and to use, but they also need to fit into the remaining space inside the calendar ring. Because the calendar ring is offset, I have to take that offset into account

The largest dimension of the shadow square is its 45 degree diagonal, so if I draw a line at 45 degrees from the center to the right bottom side of the astrolabe, stopping at the inside edge of the calendar ring, I can use that point to erect the rest of the square.

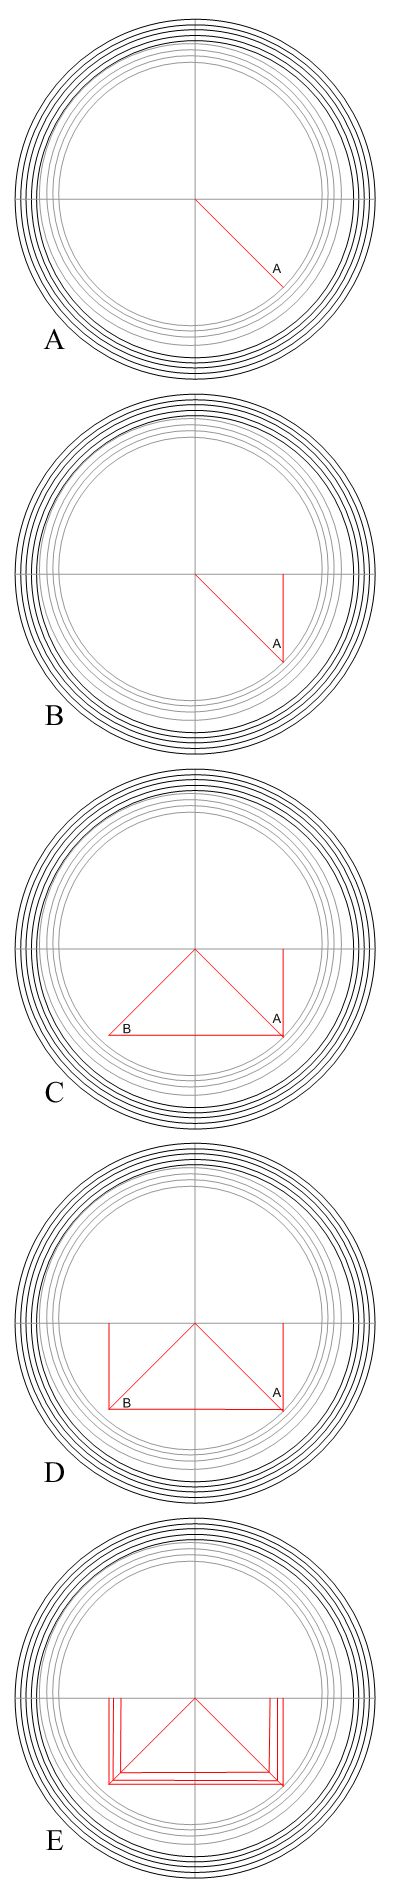
Step 1: Draw the 45 degree diagonal from the center down and right to where it touches the inside of the calendar ring on the bottom right side of the astrolabe back. Mentally label this point “A” (See Figure A).

Step 2: Erect a vertical line from point A to the horizontal center line of the astrolabe (see Figure B).

Step 3: Erect a line parallel to the horizontal center line of the astrolabe, running from point A to the left side of the astrolabe (see Figure C).

Step 4: Draw the 45 degree diagonal from the center down and left to where it touches the line drawn in the previous step. Mentally label this point “B” (see Figure C).

Step 5: Erect a vertical line from point B to the horizontal center line of the astrolabe as you did in step 2 (see Figure D).

Step 6: Draw a scale line inside the box you just drew (see Figure E).

Step 7: Divide and label the Shadow Squares.